
Git Notes
Notes on how to use Git, such as, initialising or cloning a repository, adding files to the staging area and committing staged files.
A pretty comprehensive tutorial is available at https://www.atlassian.com/git/tutorials/.
The official Git documentation is available at https://git-scm.com/doc.
Initialising a new Git repository
Navigate to the folder where your repository will be, and then type:
git init
Confirm proper setup of repository by typing:
git status
Cloning an existing repository
To clone an existing repository from a local machine or a remote machine accessible via HTTP or SSH use:
git clone <repo>
To clone it into a specific directory use:
git clone <repo> <directory>
Configuring repository settings
Use the git config command to specify repository specific settings.
For example, to define the author name for all commits in the current repository, use:
git config user.name <name>
Setting global settings
To configure properties that will be used in future commits in all git repositories present on a machine use the --global option. For example, to configure the author name and email globally use:
git config --global user.name <name>
git config --global user.email <email>
Viewing all global settings
To view all the Git global settings use:
git config --global --list
Adding files to the staging area
First time you add or creates files in a new repository you can add them all to the staging area in Git by using:
git add .
The staging area in Git allows you to choose which changes you want to include in a commit. So even if you have changed multiple files you can add some files using git add <filename> commands or git add <directory> commands to add whole directory contents, and then commit only those changes using the git commit command.
This way each commit is as specific as possible so that one can easily identify the commit that introduced an issue or bug.
Commiting staged changes to repository
Once new and updated files have been staged using the git add command, you can commit the snapshot to the project history using the git commit command.
Doing so will launch a text editor where you should in 50 or less characters write a commit summary, and then follow that with points expanding on the specific details of the changes.
For example:
Summary of changes in commit
- Detail of a specific change in this commit.
- Details of other changes included in this commit.
- Details of last change included in this commit.
If you are commiting a small change and only need to include a one line summary you can use the -m option as follows git commit -m "<message>".
Ignoring files
Git uses a file named .gitignore to read a list of filenames and directories to ignore so that they are never included in a repository. For example, compiled binary files, say, *.obj, *.pyc, and *.exe are in general not included in repositories.
The reason behind such a decision is that these files can be generated from source and most of them are intermediate or temporary files. In other words, they are not source code or material that has been created by a person so usually they do not need to be version controlled.
Files and directories that are commonly excluded from repositories should be specified in the global .gitignore file. The global .gitignore file is usually located in the user’s home directory on Linux systems. To find the exact location use the following command:
git config --global core.excludesfile
The above command can be used to specify a different location if required, as follows:
git config --global core.excludesfile <.gitignore_filepath>
Ignoring repository specific files
Each project is unique and so sometimes you will need to exclude files and directories which are project specific. In such a scenario, create a .gitignore file in the root directory of the repository and include the directories, filenames or extension wildcard of the files you want to ignore, one per line. For example:
/temporary_dir/
logs/
*.temp
For all the patterns supported in .gitignore files refer to the official Git .gitignore documentation.
Viewing the repository commit log
To view a log of the commits made to the repository, use:
git log
For a more brief outline use:
git log --oneline
To view the history commit log for a particular file use:
git log <filepath>
To view a very detailed commit log, including lines removed and added, use the -p option as follows:
git log -p
To view the names of the changed files only, use:
git log --name-only
To view the names of the changed files along with their status, use:
git log --name-status
The most common statuses are:
| Status Letter | File Status |
|---|---|
A |
Added |
D |
Deleted |
M |
Modified |
R |
Renamed |
To limit the log entries to the last n entries, use the -n option as follows:
git log -n <number>
For instance, to list the last 4 commits use git log -n 4.
View old commits
By using git log one can learn the commit ID of past commits. This ID can be used to checkout old versions of the whole project or of a specific file.
The command git checkout <commit>, where <commit> is the unique commit ID, will restore the project to the state it was on that particular commit. This process does not result in any losses, all subsequent commits and current staged or unstaged changes are still available.
To go back to the current status before the checkout process, use:
git checkout master
Checking out a file
On the other hand, checking out a specific file does change the current project status. To checkout a specific file use:
git checkout <commit> <filename>
The checked out file is staged for commit, so if you commit at this point you will lose any changes performed between the commit from which the file was checked out and now.
If you do not want to lose changes and want to go back to the current status of the file use:
git checkout HEAD <filename>
Revert a commit
If you want to remove the changes introduced by a particular commit use:
git revert <commit>
This will keep the whole repository commit history intact, by undoing all the changes introduced in the commit specified, staging them and appending a new commit. With the revert command the project history is not changed and specific commits can be reverted without the need to remove and re-commit all interim commits.
Reset a commit
Be careful when using the reset command since this results in changes to the project history.
It is usually used to undo changes in the staging area or working directory.
Note: The reset command should never be used on shared repositories.
Remove file from staging area leaving working directory unchanged
git reset <file>
Remove all files from staging area to match most recent commit
git reset
Reset staging area and all uncommitted changes
git reset --hard
Go back to a specific commit and update all files in working directory with changes introduced since that commit
git reset <commit>
This allows you to re-commit the changes, perhaps to commit changes in a more granular fashion.
Destroy all changes both committed since commit and currently in staging area and working directory
CAUTION: Use this command very carefully, only if you are sure of what you are doing.
git reset --hard <commit>
Adding forgotten files to the last commit
If you forget to add some files to the staging area before committing, there is an easy way how to add those files to the last commit.
First, add the files you previously forgot to the staging area using the usual git add command and then type:
git commit --amend –C HEAD
This last command will amend the commit specified by the -C option, which in this case is the last commit, i.e. HEAD.
Note: The last commit will have its SHA1 ID changed following the amend command.
How to organize software development projects on Git
Source control and versioning is crucial to manage any software development project, even more so when the project is substantial and many people are involved. To ensure project work flows smoothly, it is best to agree on a branching strategy before starting a new project. A pretty sensible branching model that is adopted quite extensively in the industry is the GitFlow branching model by Vincent Driessen, explained in detail in this blog post, A successful Git branching model.
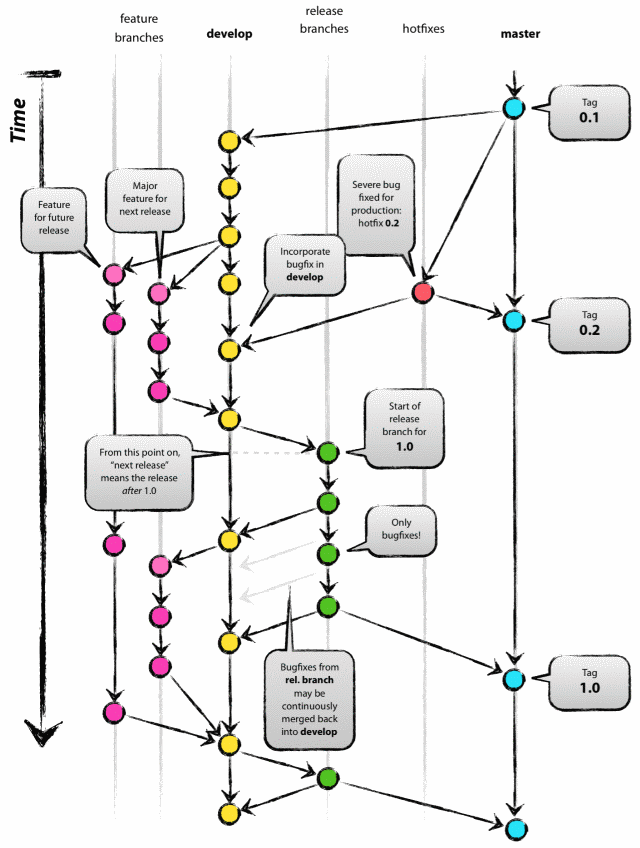
Source: https://nvie.com/posts/a-successful-git-branching-model/